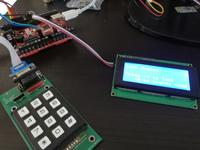
Arduino Leonardo - Electronical Lock
Geplaatst opThis project is just the barebones. It's an 3X4 Matrix Numpad with an 4 rows x 20 characters display and a servo (optional).
Options:
- Enable Changing the passcode while the pragram is running
- Enable the servo (only usefull for testing purposes )
- Enable the serial debug (only for test purposes or nerds :-) )
Further code changes can be found on my github page: https://github.com/Sani7/ArduinoLock
Arduino Leonardo - Electronical Lock - BOM
Arduino Leonardo - clone Direct leverbaar This one is a home brew leonardo from https://e2cre8.be/ € 12,00 20x4 Karakters lcd module blauw Niet op voorraad With the I2C module for easy communication with the leonardo € 7,00 4x4 Button keypad Direct leverbaar 3X4 button keypad works to € 3,40 FEETECH High-Torque Servo FS5115M Direct leverbaar This servo is from HITEC Servo (optional) € 26,95 I2C LCD interface module Direct leverbaar I2C LCD interface module € 2,30 Totaal € 51,65How does the code work?
- First we create all our variables (A lot at first but we use them all)
- Seccond we initialise all our libraries
- The keypad library requires us to give the Keymap (Where every key is positioned), how many rows and colloms there are and where the pins are connected to
- The LCD library requires us to give some stuff too
- The servo library requires us to create an attribute for our new servo
- Functions:
- The initialisation of the LCD Now to start the program we want to test if the lcd is fully functional by:
- Enabeling, disabeling and reanabeling the backlight
- Showing the start message on the screen
- The ability to disable backlight afther 30 secconds
- Getting the pressed key
- Getting the code from user input
- Check the code if it's correct or not
- Open or close the lock
- Read and write the stored code to eeprom memory
- Getting a new code while the program is running
- Comparing the to given codes and see if they match
- The initialisation of the LCD Now to start the program we want to test if the lcd is fully functional by:
- Setup:
- Getting the eeprom code
- When enabled initialize the servo library to attach to the servo
- Initialize the lcd
- When enabled initialize the Serial communication
- Main Loop:
- Getting the keypress
- When you are in the unlocked state and you press * the lock is going to close
- When you are in the unlocked state and you press # the lock will enter "Change Passcode" state
- Open the lock when the LockState in true same as Opened (Pretty straigth foreward isn't it)
- Or getting user input to get the code.
 Arduino Leonardo - Electronical Lock - Opened


